
Open-concept living has been the most requested floor plan change for over a decade, and it almost always starts with the same sentence: “What if we just knocked down this wall?”
Sometimes that’s a weekend project. Sometimes it’s a structural engineering problem that, handled incorrectly, can cause your roof to sag, your floors to crack, or, in worst-case scenarios a partial structural failure. The difference between those two outcomes comes down to one question: is the wall load-bearing?
Here’s how to find out, what it actually costs to remove one safely, and why this is one renovation where cutting corners genuinely isn’t worth the risk.
What a Load-Bearing Wall Actually Does
A load-bearing wall carries structural weight from above transferring the load from your roof, upper floors, and other structural elements down through the wall itself, into the foundation, and ultimately into the ground beneath your home.
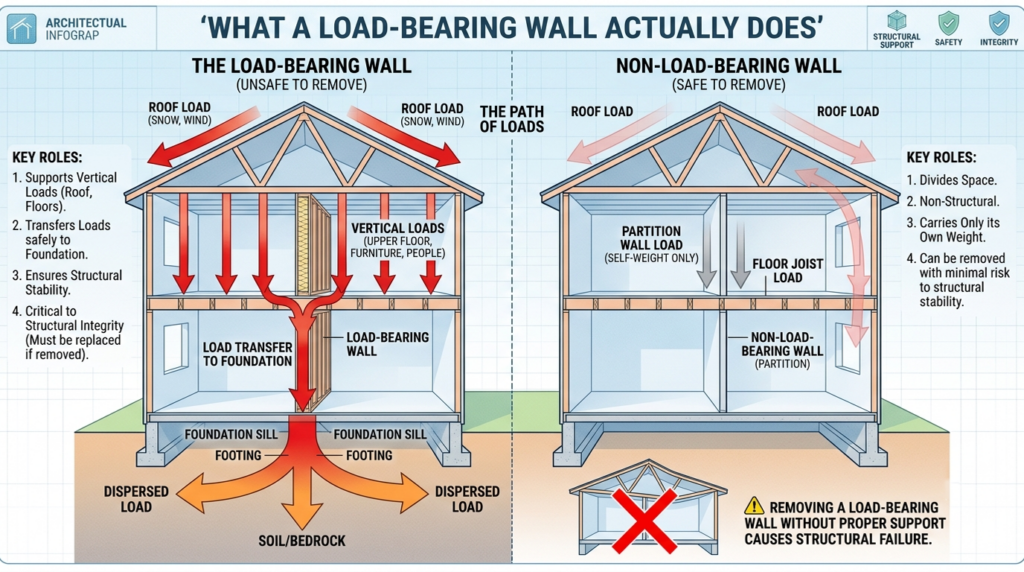
A partition wall (sometimes called a non-load-bearing wall) does none of that. It exists purely to divide space and separate a bedroom from a hallway, for instance, and carries no structural weight beyond its own.
Remove a partition wall, and the house doesn’t notice. Remove a load-bearing wall without proper support in place, and you’re asking the floors and roof above to hold themselves up with nothing underneath them. That’s how you get sagging ceilings, cracking drywall, stuck doors and windows, and in severe cases, structural collapse.
How to Identify a Load-Bearing Wall (Before You Call Anyone)
You can do a reasonable amount of detective work yourself before bringing in a professional. None of this replaces a structural engineer’s final assessment, but it’ll help you understand what you’re likely dealing with.
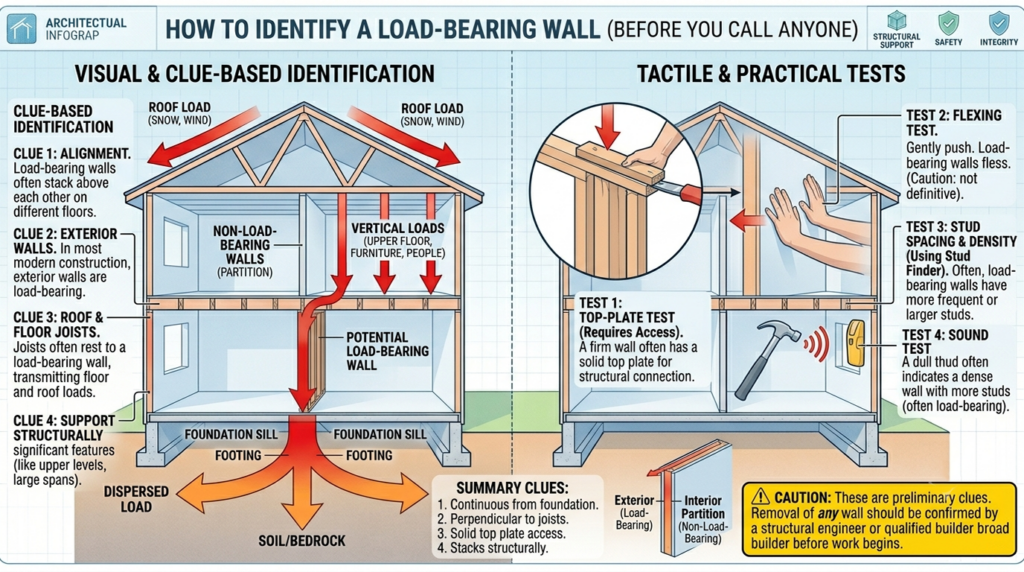
Signs a wall is probably load-bearing:
It runs perpendicular to your floor joists or roof rafters. Floor joists typically run in one direction across your home. A wall that runs perpendicular to those joists is very likely supporting them. You can often check this from an unfinished basement or attic, where the joists are visible.
It sits above another wall on the floor below, or below one on the floor above. Load-bearing walls usually stack vertically through a multi-story home, transferring weight all the way down to the foundation. If there’s a wall directly above or below the one you’re examining, that’s a meaningful red flag.
It’s located near the center of the house, along the home’s main structural spine. Exterior walls are almost always load-bearing (they support the roof structure at minimum). Interior walls running through the center of a home, where a support beam or “center beam” runs, are frequently load-bearing too.
There’s a support post or column in the basement directly beneath it. If you go to the basement and find a steel or wood support post lined up underneath the wall in question, that’s strong evidence the wall above is carrying real structural weight.
It’s thicker than surrounding walls or contains ductwork/plumbing stacks. This isn’t a guaranteed sign, but load-bearing walls are sometimes built thicker to accommodate structural members, and major utility stacks are often run through load-bearing walls for stability reasons.
Signs a wall is probably a partition (non-load-bearing):
- It runs parallel to the floor joists rather than across them
- There’s no wall, beam, or post directly above or below it on other floors
- It’s a relatively short wall segment that doesn’t connect to the home’s main structural grid
- It was added during a previous renovation, separate from the original structure (closets are common culprits)
The bottom line: Many load-bearing walls show no obvious visual signs at all, which is exactly why skipping professional confirmation is the most common and most dangerous DIY mistake.
Why You Cannot Skip the Structural Engineer
A structural engineering assessment typically costs $300 to $800, sometimes a bit more depending on your region and the complexity of your home’s framing. Compared to the cost of a renovation gone wrong sagging floors, cracked foundations, or a collapse that requires major structural repair and potentially displaces your family from the home that fee is close to a rounding error.
A qualified structural engineer will:
- Confirm definitively whether the wall is load-bearing by examining your home’s framing, blueprints (if available), and load paths.
- Calculate the size and specification of the replacement beam needed to carry the load that the wall was previously supporting.
- Provide stamped engineering drawings, which your local building department will require before issuing a permit for the work.
Skipping this step to save a few hundred dollars is, by a wide margin, the most expensive mistake homeowners make in this category of renovation.
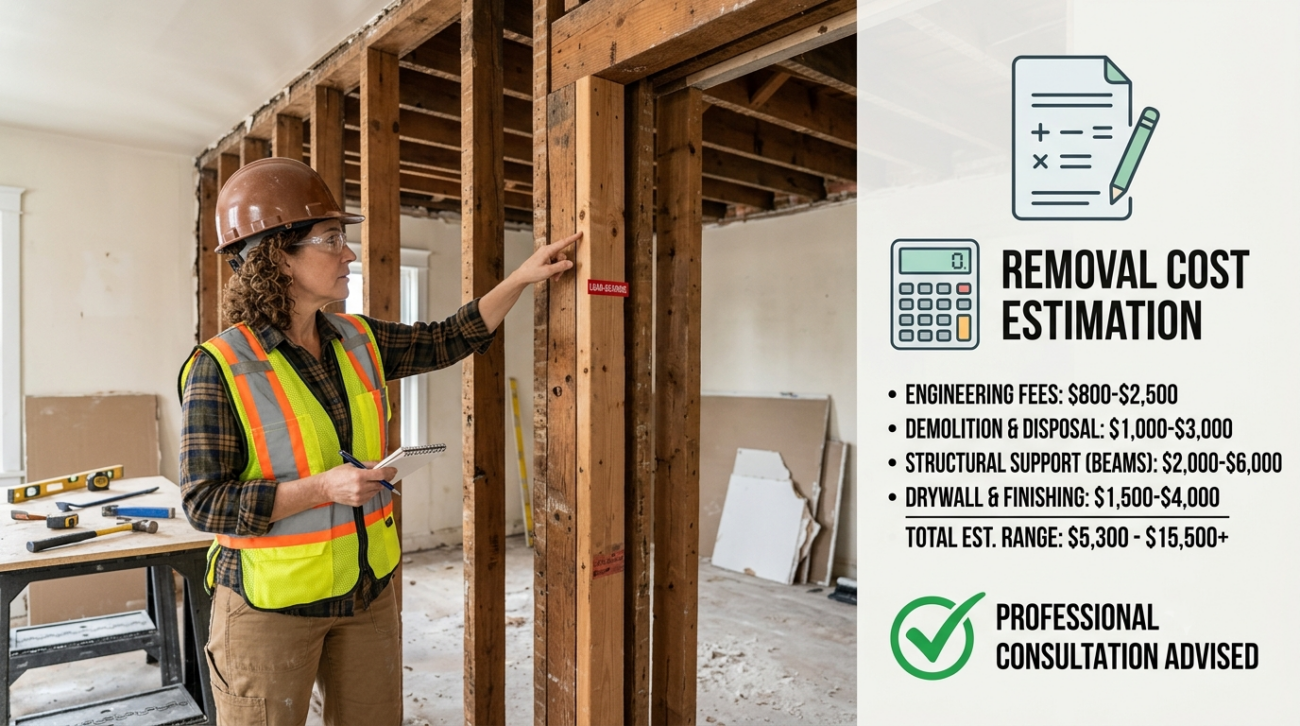
What Load-Bearing Wall Removal Actually Costs
| Project Scope | Estimated Cost Range |
|---|---|
| Structural engineer assessment | $300 – $800 |
| Permit fees | $200 – $1,000 (varies significantly by municipality) |
| Basic removal with replacement beam (single story) | $3,000 – $10,000 |
| Removal with beam (multi-story load above) | $7,000 – $20,000+ |
| Temporary shoring/support during construction | $500 – $2,000 |
| Electrical/plumbing/HVAC rerouting (if present in wall) | $500 – $5,000+ |
| Drywall, flooring, and finish repair | $500 – $3,000 |
National average for a standard residential wall opening: roughly $5,000 to $12,000 all-in, though simple single-story removals with no utilities inside the wall can come in closer to $3,000, while complex multi-story situations with significant utility rerouting can exceed $20,000.
Cost Breakdown by Wall Material
| Wall Material | Approximate Removal Cost | Debris Disposal |
|---|---|---|
| Drywall over wood studs | $300 – $1,000 | $100 – $300 |
| Plaster and lath (older homes) | $600 – $1,500 | $100 – $300 |
| Brick | $1,000 – $3,000 | $250 – $500 |
| Concrete or block | $1,000 – $3,000+ | $250 – $500 |
These figures cover demolition only; the structural beam, engineering, permitting, and finish work are separate costs layered on top, as outlined above.
The Replacement Beam: Where Most of the Cost Lives
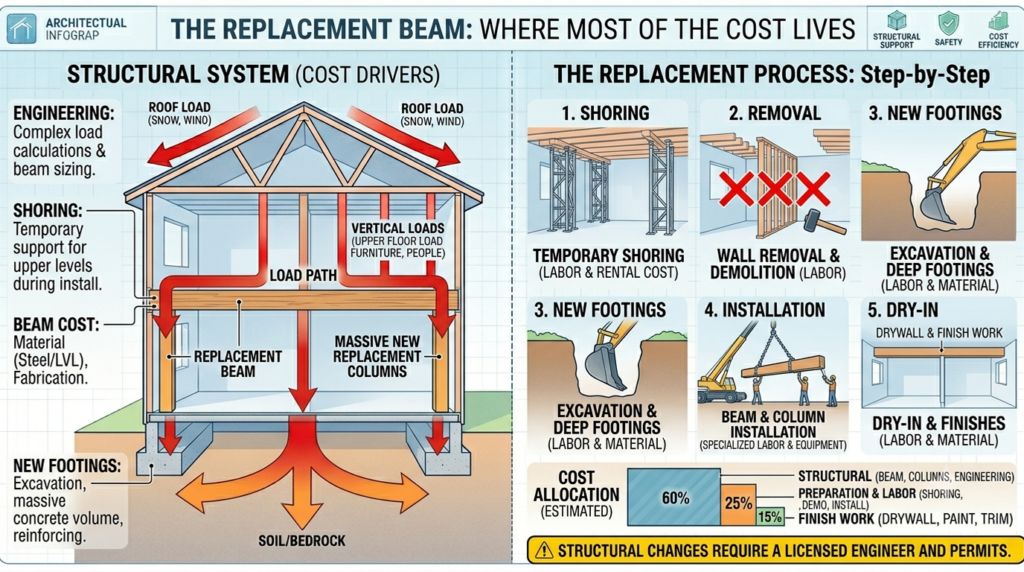
When you remove a load-bearing wall, you’re not just taking the wall away; you’re replacing its structural function with something else, almost always a horizontal beam installed in its place (sometimes hidden in the ceiling, sometimes exposed as a design feature) that’s supported on either end by posts that carry the load down to the foundation.
Common beam types:
- LVL (laminated veneer lumber) beams: The most common choice for residential single-story openings. Engineered wood that’s stronger and more dimensionally stable than solid lumber.
- Steel I-beams: Used for longer spans or heavier loads, particularly in multi-story homes carrying weight from above. More expensive than LVL but handles greater loads in a shallower profile.
- Glulam (glued laminated timber) beams: Sometimes chosen when the beam will remain exposed as a design feature, since they offer a more attractive finished appearance than steel or standard LVL.
The engineer’s calculations determine exactly which beam size and material your specific situation requires; this is not something to guess at or borrow from a similar-looking project online. Load calculations depend on the specific span, the weight above, and your local building code requirements.
What Happens During the Actual Removal Process
Step 1: Temporary shoring. Before any demolition begins, temporary supports, such as adjustable steel jack posts or temporary stud walls, are installed on either side of the wall to carry the structural load while the permanent beam is being installed. This step cannot be skipped or rushed; undersized or improperly placed temporary support is one of the most common causes of problems during this type of project.
Step 2: Wall opening and utility identification. The wall covering is removed to expose the framing, and any electrical wiring, plumbing pipes, or HVAC ductwork running through the wall is identified and rerouted by the appropriate licensed trade before structural work proceeds.
Step 3: Beam installation. The new beam is installed at the calculated size and position, typically resting on new support posts at either end that carry the load down through the floor framing to the foundation (sometimes requiring additional footing work in the basement or crawl space).
Step 4: Removal of temporary shoring. Once the permanent beam is properly installed and bearing the load, the temporary supports are removed.
Step 5: Finish work. Drywall, flooring, paint, and trim are completed to blend the newly opened space with the rest of the room.
Step 6: Inspection. Your local building department inspects the completed structural work against the stamped engineering plans before signing off on the permit.
Common Mistakes That Make This Renovation Dangerous
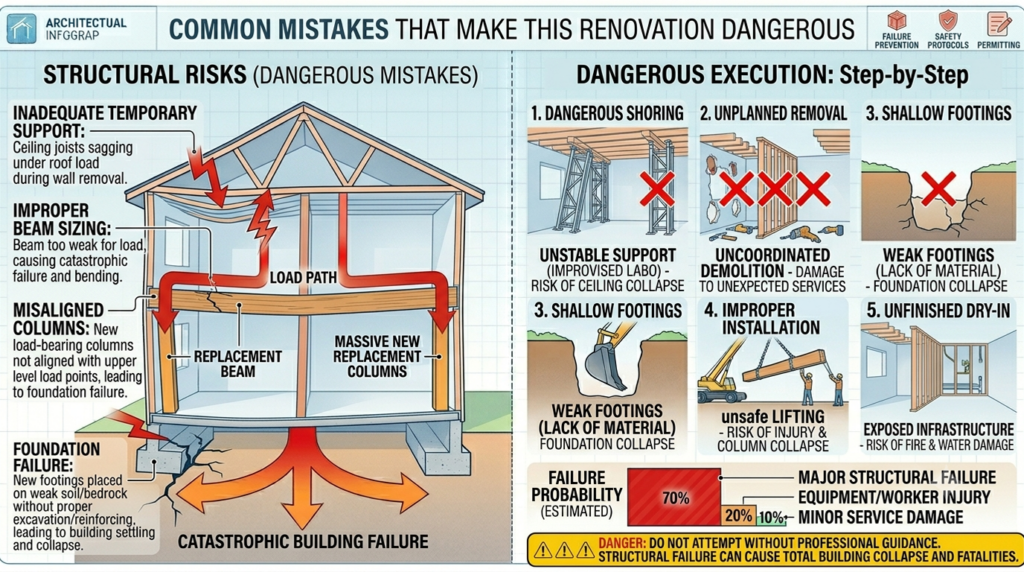
Assuming a wall isn’t load-bearing because it “looks like” a partition. Visual assumptions are unreliable. Many genuinely load-bearing walls show no obvious signs.
Skipping the structural engineer to save money. A few hundred dollars in engineering fees is insignificant compared to the cost of structural failure or a failed home inspection at resale.
Inadequate temporary shoring. Undersized jack posts, or shoring placed in the wrong location, can allow settlement and cracking even before the final beam goes in.
Forgetting about what’s inside the wall. Electrical wiring, plumbing supply or drain lines, and HVAC ductwork frequently run through interior walls and must be properly rerouted by a licensed professional before the wall comes down, so they are not discovered mid-demolition.
Not budgeting for flooring repair. Once the wall is gone, you’ll likely have a visible seam or transition in the flooring where the wall used to sit. Budget for this from the start; it’s often the most visually obvious unfinished detail in an otherwise great renovation.
Doing the structural work itself. Demolishing can sometimes be DIY (with proper precautions and after engineering confirmation). The structural beam installation should not be. Incorrectly installed beams can fail gradually, sometimes over years, causing damage that’s far more expensive to discover and correct than it would have been to do right initially.
Do You Need a Permit?
Yes, in virtually every jurisdiction in the United States. Removing a load-bearing wall changes your home’s structural integrity, which means it falls under building code requirements regardless of how “simple” the project looks.
Your contractor or structural engineer will typically handle the permit application, but confirm this explicitly before work begins and never allow load-bearing wall removal to happen without one. An unpermitted structural modification is a major red flag during any future home sale and can require expensive retroactive correction.
Bottom Line
If you’re dreaming of an open floor plan and there’s a wall standing between you and that vision, don’t let the uncertainty stop you from exploring it load-bearing wall removal is one of the most transformative renovations available, and it’s done safely in homes across the country every single day.
The key is sequencing it correctly: identify the likely structural role yourself, confirm it with a licensed structural engineer, budget realistically for the beam and the trades work hiding inside the wall, and never skip the permit or the inspection.
Done right, this is a renovation that pays for itself in how the entire home feels. Done wrong, it’s the kind of mistake that takes years to fully reveal itself.
ALSO READ: Closet Organization Systems: What They Actually Cost and Which One Is Right for You